Lets be practical....
This article is a continuation from Part I.In this part, I will be introducing you to something called SqlMigrations. You will need to install the SqlPackage.exe which comes part of SSDT.
SqlMigrations is a nuget package that will turn a command line program into a sql migrations type project.
We will be completing the following practical and explaining why along the way:
1) Setting up a Sql Project
2) Setting up a SqlMigrations project
3) Adding SQL Migration upgrade and down grade scripts
Setting up a SQL project.
We are going to look at setting up a SQL project and add it to a solution in Visual Studio.
Step 1 - Add a new Sql Project:
In your solution (if you dont have one, create one), right click on the solution and add a new project.
Under the "Other Languages" project type, click on SQL Server, and select the SQL Server Database Project. Give it a name of "SqlMigrationsDemoDatabase":

Step 2 - Importing an existing database
So, I already have a database sitting in "production" (its actually sql express on my location machine), and I want to base my database project to be based on it. That way I will know that what I have checked into source control will be exactly the same as what's production. If I were to make changes, I know it will be compatible with whats in production, and that my migrations scripts that have gone through testing will work live.
Visual Studio makes importing an existing databases schema and security really easy.
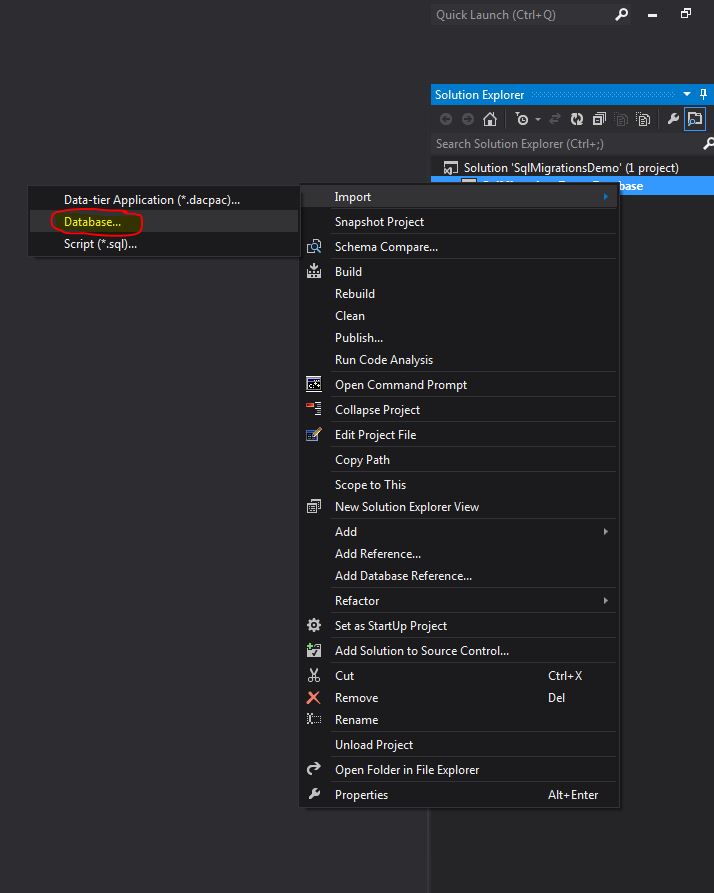
First, right click on our newly created project and import->database as shown below:


Visual Studio makes importing an existing databases schema and security really easy.
First, right click on our newly created project and import->database as shown below:
This pops open a wizard.
Under the "Source database connection" section, create a new connection the the database you want to import:

And then click the start button:

When the wizard has finished, check the "Finished" button to close it down.
You will notice that the Wizard has imported your database and has create a folder structure to hold your tables, procs views etc. Its worth going to explore how the project is set up. Its a little out of scope of what we are doing here.
So now, we have our database project. What we want now is the ability to deploy the database via a command line application. You can deploy from right-clicking the project and say "Deploy", but that functionality isn't available for us from a CI/CD point of view. We also want to have a physical script file that we can keep to run against all servers in the future.
We also want to be able to deploy the database to be created each time if it doesn't exist. Say you want to develop in your own local environment and not affect other developers. To do this, we need something can run the generated scripts and keep track on which ones have been created.
Setting up a SQL Migrations Project
Carrying on from the last practical step, we want to be able to generate update scripts and store them to be run later. This is where the SQLMigrations package comes to the rescue (Note, its in Beta release). It will allow you to create increment scripts for updating your database, store them in a command line project, and also have the ability to run the scripts later on.
Step 1 - Creating a SqlMigrations project:
Create a new command line project in your solution and call it "SqlMigrations":
When you have done that, install the SqlMigrations nuget package to that project. To do so, follow the steps below:
1) Open the Package manager console by clicking: Tools -> Library Package Manager -> Package Manager Console:

2) In the manager console, ensure the SqlMigrations Project is selected:

3) Install the package using the following command: Install-Package SqlMigrations
You will notice the following things are added to your SqlMigrations project:
- Scripts Folder: This is the folder that the tool will look for scripts in. The scripts are "Embedded resources" in the project. This was done so because it removed the "Accidental" tampering that can happen to scripts.
- App.config: This is used to store the sql connection string for your "CIServer", the path to the dacpac file generated by your sql project. It also contains settings like "MDF and LDF" file path locations for newly created databases (used if they differ on each server).
- Deploy.ps1: I added this file for people who use Octopus Deploy. You will notice that a build/version number must be passed in order to rollback databases. If you dont supply one, the default is 0.
- Example code: This is the code that is required for running the app
Rebuild the whole solution to make sure there are no errors!
Setting the CIServer
At this point, there must be no database on your CI sql server. Ill explain why in part III when we get to the "Continuous Integration and Deployment" and how it will work within a team of developers.
1) Open up the App.config and set your CIServer connection string:
2) Since nuget doesnt work with SqlProjects, we need to set the relative path from the SqlMigrations project to the dacpac file (in the bin folder) in the database project. If you cant find the dacpac file, be sure to build the "SqlMigrationsDemoDatabase" project first:
3)Copy the code from the "ExampleCode.cs" file and paste it into your program.cs file, and resolve any namespace issues:

We are new ready to add our baseline script.
Adding a baseline script.
Now that we have installed the nuget package and setup the app condig, we need to create a baseline script. The baseline script is used to create the database from scratch, and for people with existing databases, it is used as the "Production Baseline" which is the script that will be run to match the existing production database that you will be building from.
To do so, follow the following steps:
1) Go to the package manager console, and ensure the SqlMigrations project is selected.
2)Type the following command: "AddSqlMigrations"
3) You should see the following:
Dont worry about the last error message. The migration script creator tries to create a undo script, but at this point, creating an "undo database" does not exist.
You will also notice that a new file has been added to your scripts folder:

If you open that file, you will see the sql script that was generated to create your database, and then to run all the schema scripts (create tables, views procs etc) that exist in your sql project. Since this is a special file (your baseline) we must rename this file to be "_Baseline.sql":

You SqlMigrations project will know to run this file if the database doesnt exist on the deployment server.
Check-in!!!
From this point on, you will have source controlled your database that matched the production server. In part III, we will look at CI and CD using the SqlMigrations project, but for now you can manually run the SqlMigrations.exe in your solution to auto deploy your new database.
To manually deploy your script to your CI server, you can run the SqlMigrations project in Visual Studio.
You will see a screen like this when the console app has finished running:

If you go look at your CI server, you will see that your database has been created!
You are now ready to go ahead an create incremental update scripts.
Adding SQL Migration upgrade and down grade scripts
Adding incremental upgrade scripts is easier than the previous section. To prove this, we will go add a new table to our sql project and create the migration script for it:
1) Go to the database project and add a new table called "Item". Add 2 columns to that table called Id and Value. You can set the PK on Id and make it an identity insert if you like - up to you.
2) Save your changes to your projects and rebuild it
3) Go the package manager console and use the "AddSqlMigration" command again.
4) Have a look at the 2 new files added to your SqlMigrations project:

Open the first file that doesn't have the "_Undo" prefix. Notice how it has the incremental change to create the new table! Fantastic!
Now go and have a look at the "_Undo.sql" file and notice how it has the "Drop" table script. This will be used for the rollback strategy in the CI and CD in the future to be able to rollback to previous builds!
Thats it for now. This was a very practical guide on how to conduct sql migrations as a developer.
In the next part we will be looking at how we can use CI and CD tools to handle the deployments, and how it should work between team members developing against the same database.